My Easy Flash Project

SkydivinGirl

Retro Girl
Joined
Dec 16, 2008
Posts
7,068
Country
USA
Region
Raleigh, NC
He everyone!

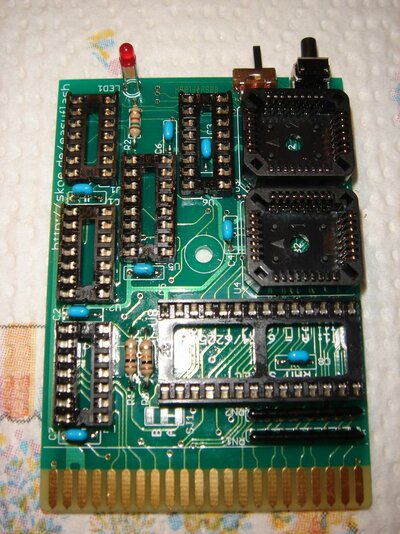
As many of you know, I asked a little while ago where to get help with proper soldering. Many of you stepped up and gave me some wonderful advice and I was finally able to put it to use. Today, I soldered together my EasyFlash kit and it looks wonderful! I think I went a little overboard with the flux and had a couple correctable mistakes but no problems otherwise.

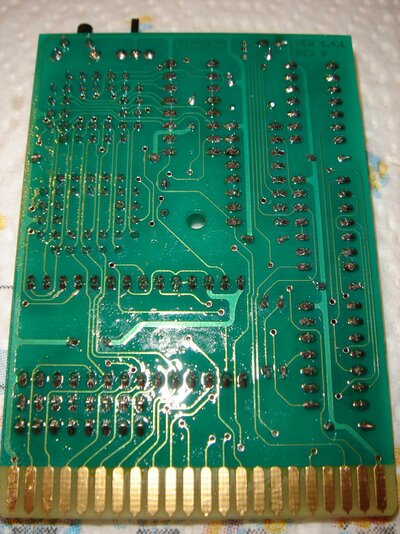
The only problem I have at this point is the flux left a very sticky residue on the board that I don't know how to remove. I used 91% Isopropyl alcohol to neutralize the flux but the board is a sticky mess. :) Would someone please let me know the best way to remove this? I can't put the chips in the sockets or finish testing until I clean the board.

Here's pictures of the board as it sits. I'll put up more pictures once it's populated and working. :)

Thank you all again for your help!

Heather
 

Attachments

  • Easy Flash Front.jpg
    Easy Flash Front.jpg
    204.8 KB · Views: 1
  • Easy Flash Back.jpg
    Easy Flash Back.jpg
    204.6 KB · Views: 1
@SdG

you have a choice

1. dishwasher
2. soap and water

+D


---------

BTW

Pretty damn fine work there, not what I would of expect from a begininer!
 
Hey Keith!

I'll give it a good washing and let you know how it turns out. :) There is a reset switch and a slide switch. I suppose if I let it dry completely then I don't have to worry if water gets in them?

Thank you so much for the compliment! I've done soldering in the past with cheap Radio Shack irons and gotten pretty lucky all-in-all, but this is the first time I did something with this fine detail and using proper techniques. I'm very excited about how it turned out. I performed the resistance check the instructions called for and everything looked good. I'm very hopeful this means I put it together well. :mrgreen:

I sincerely appreciate all your help!

Heather
 
Nice work SDG,

I'm an amateur myself in the art of soldering, nice work there, I hope I can produce work like that one day. I highly recommend the DW as well, I used it to clean Keyboards and 99% of them still work (one got warped.)
 
Very nice work there SDG, neat and clean. (y)

I love a bit of soldering myself, but am still only a beginner. I am clearly surpassed by your skills. Good work. :D
 
Heather.

That's some seriously impressive work for a first time attempt.

Well done indeed. :nod:

Charlie
 
Heather

I very much agree with the guy's. for a first serious attempt the soldering work looks first class indeed..

Excellent work, you should be very proud my girl. !! :bowdown:

TC :)
 
@ SdG

Very nice work indeed!! I agree with Keith, dishwasher on a cool cycle then airing cupboard for a day or two to dry it out. If you really can't wait, then one good method I use is this (from my secret sneaky short-cuts book) :shhh::-

Take a pillow case, place the board inside after washing it. Carefully fold the open end up and wrap it around the nozzle of a hair dryer, securing it with a rubber band. Turn the hair dryer on on a high setting and let it inflate the pillow case whilst drying the board. The pillow case will allow enough air flow to ensure that it doesn't overheat, although I recommend that you keep an eye on it. 5 to 10 minutes should be enough to dry it out completely.

(y)
 
You're all making me blush! :) I really appreciate all the wonderful comments. I know there's lots of room for improvement and I'm a very long way from even attempting SMD components, but this is a good first step. I actually purchased two of these kits so I'll get more practice on a duplicate board. Having gone through the process once, I already know where I can make some changes in my technique.

There are a couple other items I want to tackle on my A4000D. I already purchased a coin battery kit and I'd like to check and replace (if needed) the capacitors on the '040 board. After this project, I feel a little more comfortable doing this myself.

The major things I learned from this experience are that a good, variable heat soldering iron and the use of flux make all the difference in the world! Oh, i also immediately fell in love with the dry soldering iron cleaner. It works amazingly well!

Something I read stated I should put solder on the tip before putting it in the holder to avoid oxidization of the tip when not being used. I'm not exactly sure what they mean by this. I know the tip starts to oxidize when just sitting there, but should I coat the whole tip in solder? I'm a little confused. :)

@Merlin

That's a good tip. :) I may use it in the future but, for now, I'll take the slower method. :p

Take care,

Heather
 
Something I read stated I should put solder on the tip before putting it in the holder to avoid oxidization of the tip when not being used. I'm not exactly sure what they mean by this. I know the tip starts to oxidize when just sitting there, but should I coat the whole tip in solder? I'm a little confused. :)

You should coat the "contact area" often, then use a metal scouring brush to clean off the excess. There is very little need to coat the whole tip. My soldering tips have a line where I should stop tinning. To remove oxides, heat the iron to the point where solder starts to melt on the tip, then tin it and wipe off the metal on the brush.
 
@ Heather it be a big turn on to see a photo of you with your soldering iorn you dont see photos like that in nuts if micro mart (uk) did a page 3 girl with some computer parts i think i would buy it every week and i think they would sell more

james
 
@Jimbob

That's quite a KinK you are sharing with us there my friend............. :LOL:

TC :whistle:
 
if micro mart (uk) did a page 3 girl with some computer parts i think i would buy it every week and i think they would sell more

james

Isn't that like the covers of PC Format magazine and the like, until recently?
 
LOL! It's like girls selling cars, except in this case it's geek girls selling electronics.

Of course... It's never gonna happen! :wink: LOL!

Well, the board is in the dishwasher as I type this. If all goes well, I'll have it tested the day after tomorrow. After that, I'll start on the second one. I'm super excited.

Would someone please point me to some directions to test if the capacitors on my A4000D '040 card are in backwards? I'd like to fix that soon if it needs it. :)

@Dreamcast270mhz

Thanks for information. I was thinking along the lines of soldering something then putting the pen in the stand while you do a few other things. You don't want to turn it off because you'll be using it again in a few minutes. Should you put solder on the tip before putting it in the stand to keep it from oxidizing while you are preparing the next step?

Thanks everyone!

Heather
 
@Dreamcast270mhz

Thanks for information. I was thinking along the lines of soldering something then putting the pen in the stand while you do a few other things. You don't want to turn it off because you'll be using it again in a few minutes. Should you put solder on the tip before putting it in the stand to keep it from oxidizing while you are preparing the next step?

Not a problem, i am by no means an experienced person at soldering, but have done much research (much of which involved reading my soldering station manual and YT), but yes, I do recommend you apply solder to the tip before putting it in the holder, because it will be the best preventative measure against oxidization, which is a pain to remove. NEVER use sandpaper to remove oxides, as I said, simply turn the iron up to the appropriate temperature and tin it with rosin solder, then use a scouring brush to remove excess solder.
 
@Dreamcast270mhz

Thanks for the explanation. :) I'll give it a try.

@All

Well, the washing cycle did not remove the sticky residue from the board. I used this flux. I followed the directions on the product information to remove the residue, but there's still a tacky feel to the board. Does anyone have an idea of how to clean the residue? Also, should I use a different flux in the future? This flux worked great but I don't think I can deal with the residue.

Thanks!

Heather
 
You should coat the "contact area" often, then use a metal scouring brush to clean off the excess. There is very little need to coat the whole tip. My soldering tips have a line where I should stop tinning.

this will vanish in time, and whole tip will be coated
 
@SdG

Well, the washing cycle did not remove the sticky residue from the board. I used this flux.

Ahh yes this stuff -

okay, you are just gonna have to get serious with it... you need -

1. Good Quality Electric toothbrush
2. Diluted Car-screen-wash (its got alcohol and detergents and CHEAP)
I am sure you have somthing similar state-side =)

and have at it =D - remember let the toothbrush do all the work =D
 
Nice work indeed...sorry to make you blush some more, but for a beginner (aside from myself, I was an ace from day one...jokes :cool: ), that really is quite stunning! (y)

PZ.
 
Thanks FLB! I really appreciate it. :)

@Keith

I think I got most of it with a toothbrush and Iso Alcohol last night. It looks a million times better this morning. I think the dishwasher may have ruined the slide switch because it's extremely difficult to move the switch now. I'll most likely have to replace it. :( It is still early during the drying cycle, so I'll give it a chance. I actually thought the switch was quite flimsy to begin with.

More pictures to come as things progress.

Heather
 
Back
Top Bottom