another rusty A4000 restoration

lostrego

Member
AmiBayer
Joined
Apr 4, 2011
Posts
706
Country
Spain
Region
A Coruña
Hello, as I said on a thread on the AmiOracle section, I think that's better (besides more tidy and polite) to open a new thread here with photos of my progress and work on this particular machine. Hope you like it.

Here We go with a bit of the story about this A4000 since I got my hands on it, on 1996.

What started being an stock A4000/040 with an 120MB or so crappy HD (even for that times), nothing more than the original A3640 at 25mhz and 16MB Fast, soon after got all kinds of upgrades.

Finally what I have here is an A4000 with the following:

Cyberstorm MKII 060 clocked to 66 mhz (orginally an a 040/40 but then upgraded).
128 MB 60ns Fast ram.
Picasso IV RTG Graphics Board.
X-Surf ethernet.
Tocatta audio card.
And a 120GB ide hard disk.

This A4k survived a near-death experience years ago when I intended to replace a SMD soldered super buster 9 to a rev. 11 one and commissioned this work to a local so called "electronic repair shop" just to save some bucks. These people resulted to be nothing more than a bunch of cruel electronic butchers, which ended with six or so f****d up board tracks and a ruined buster 11 chip ... :mad:

Fortunately this issue got fixed later, needless to say that this cost me two or three times more money than getting it on more expert hands at a first chance.:(

Later mods included socketed CIAs and a weird/obscure IDE port hack to improve transfer speeds (this hack consist on reprograming a GAL of the mobo that drives the IDE port's logic).

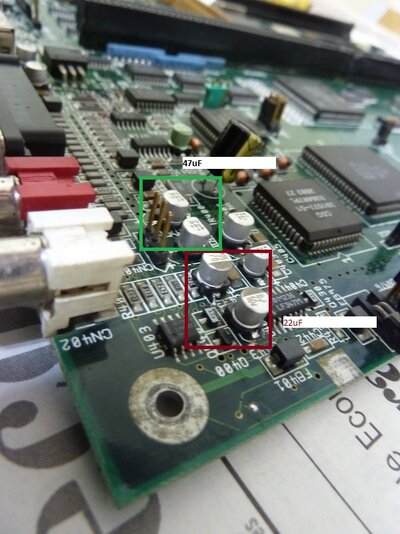
Well, this Amiga was used an abused for several years and gave me hours and hours of fun. And although I used to do a regular maintenance and take well care of it, during the last seven years maintenance was none. So problems started to arose, like f****d up capacitors, rust, rust and more rust, and all kinds of dust and crap everywere. So it's time for me to mend all this mess up before loosing another classic!.

Well, after all this boring blah blah stuff from me :roll: here are the pics of the after state:

Outside view, well no very yellowed yet but with some ugly black painting done on a moment of stupidity long time ago:

01a4kbefore.jpg


Avobe View:


02a4kbefore_inside2.jpg


Is this an A4k PSU or a rat's nest? :


03a4kbefore_PSU.jpg


Dust, rust and crap from the inside and if you look closer, the remains of the SuperBuster 11 drama (well and a pair of eproms :whistle: hehe):


05a4kbefore_rust.jpg


Well that's all for today, I'll post more interesting hardware pr0n later if you like it.

Bye!
 
Last edited by a moderator:
Thanks for sharing (y)

Looking forward to seeing that fine machine braught back to its former glory :)
 
@lostrego

I'm pleased to see you've managed to rescue your Miggy.

But please mind the language - this is a family friendly forum.

I'll edit out the words as required (y)

Dave G :cool:
 
That old girl's been through a lot, hasn't she! Good luck with your restoration project and do keep us posted with lovely pics! :drool:
 
So much potential and you already have lots of nice components too. Good luck with the restoration (y)
 
Good luck, i'm sure it wont be a hard job to remove it

What a nice time to spend touching her beautiful internal parts!!!
 
@davideo

My apologies, mate, I've to read the forum rules more carefully as I wasn't aware of this (the price of being a newbie). Honestly, there was no real intention of being rude by swearing, I just used it to add a bit of dramatism to the text. :)

Won't happen again.(y).

To the rest: Thanks for your support, I'll post more pics next week, like mobo cleaunp, capacitor replacement and other things that had already been done to it.

Actually I Fired it up again 2 days ago and runs like new :D , but still have a lot of work to be done, like changing capacitors on the zorro riser board, do the same to the PSU as it sometimes refuses to start and some other things that I have in mind...

Bye!
 
Hi,
little bit rusty but looks so far good. Could you share your re-programmed GAL?

Best regards

FD
 
here's some soap for your Amiga and mouth :p

soap.jpg


Good luck! :D
 
Hi,
little bit rusty but looks so far good. Could you share your re-programmed GAL?

Best regards

FD

No, sorry, unless is it possible to somehow extract the code from it. As this hack wasn't done by me at all.

All that I know about that is that It makes the IDE port somehow PIO-2 compilant, and It makes the IDE Port to run at transfer rates of around 4MB/s on 060 systems. (note that this speed gains are very CPU speed relative, so dont expect much increase in an say for instance A3640/25 config).

And the reprogrammed GAL in question is the one in position U902 just next to the floppy and IDE connectors, this one is socketted on my mobo if you look carefully at the pics I've posted.

This particular hack was achieved and done years ago by an a brilliant spanish Amiga technician as part of the services that he offered. The Sad thing of this history is that this guy left Amiga bussines years ago also, and unfortunately the code for this particular hack never got released to the public AFAIK.

This thing was a matter of debate for spanish Amiga Fans on mailing lists ands such for a long time, and the last thing that I know about is that one Amiga user here got recently in contact (say march, this year) with the creator of this hack (among some other hacks, some of them even more awesome than this, like one that managed to make an A4000D rev B mobo to address up to 64MB, yes you readed it right, an 4x16MB SIMMs memory configurtation!) and seemed than he managed to convince him to look for his old schematics and sources and then release them, but this didn't happened ATM.

The good news are that I've found that this spanish Amiga technician wasn't the only one to made something alike, and just googling around about that matter I've found a Polish Amiga fan at EAB that achieved to made a simmilar hack with what seems identical results, but in this case reprogramming both U901 and U902 GALs:


http://eab.abime.net/showpost.php?p=603519&postcount=39


bye!
 
Last edited:
Well there goes an update as promised:

Most of this have already been discussed and shown on a thread that I've opened at the AmiOracle section:

https://www.amibay.com/showthread.php?t=15955

It's About a deep Mobo cleanup, caps replacement an so on...

When I disassembled my A4000, one of the first things, and bad news, are that some of the mobo capacitors were in already bad shape and, as would have it no other way , with some nasty capacitor's electrolyte leakage included.

And for the good side of the story, no battery leakage/damage at all, as I was always aware of this matter. So I've replaced it through these years soon after showing up any trace of corrosion. After all, I can be a bit careless, but not enough to neglect this.

Mr. Leakage itself:

06a4kbefore_caps.jpg


The "funny" side of this thing is that, yes, the Audio area seemed the worst of all in all this capacitors scenario, but the audio worked well! , for instance there were no fading at any of the audio channels and so, weird thing.


Well, once seen that I've started a general Mobo cleanup including cleaning it with IPA an with the aid of cottons swabs , tooth brush and a soft cloth.

Then I Cleaned it Again with distilled water and again bruishing it
etc... and finally letting it to dry for some days.

Note that I'm an smoker so a big part of dirt was caused by this habit, including some nasty and hard to remove nicotine all around the board (another good reason to convince me myself to kick the habit :unsure:)


After IPA cleanup:

07a4k_clean.jpg


Well I'll admit that I made a big mistake once I started to clean it with distilled water as the 3.6V RTC battery still there, so when I realized this error I just get rid of it urgently. As for, what I know, is not a good idea to mix live 3.6V tracks on the board with water running around, even if It's distilled water. Fortunately nothing got damaged. :)

Then after all this cleaning process I managed to replace all the capacitors (besides cleaning it's locations with IPA) on the board with the help of a friend also interested in messing around with hardware and electronics.

However the corrosion from the leakage around the audio circuitry made at least one of the track's pads became ultra fragile, as it was sitting nearly on air, so it broke. But nothing that a tiny wire to a nearby same track-hole and some soldering can't solve.


A pic of this particular area with all new capacitors:

08a4k_caps_replaced.jpg


And Finally two pics more of the overall all-things-done result:


08a4k_mobo_clean2.jpg


08a4k_mobo_clean.jpg


Well after all, I've tested it last week, and works flawlessly. Audio is working ok, and the whole system runs with perfect stabilty after running some demoscene prods to put all the custom chips at effort for near two hours...

And Perfect! :D


09a4k_works.jpg


Hope that you like it, I'll post more progress later if you want.


Bye!
 
Nice work and thanks for sharing, I'll have similar work to do on an A4000 I am getting soon.

Its great to see this A4000 back to her former glory (y)

Steve.
 
And that above picture is what it is all about! Well done to you for bringing that mobo back to life :cool:
 
Hi,
I am not sure but I think I found a little mistake near audio circuit. I have currently no mobo for checking but maybe I am wrong.

Better you have a look :)

Best regards

FD
 

Attachments

  • 08a4k_caps_replaced.jpg
    08a4k_caps_replaced.jpg
    81 KB · Views: 2
Again, thanks everyone for your support!

@fitzsteve

Lets hope that you'll get that A4000 cleaner than mine was :LOL:

@Fieldday

Thanks for the hint but all seems correct. :)

To avoid this kind of issues, I've taken some close hi res photos of the board after the caps replacement, just to be sure, and I've triple checked them before testing the mobo up and all caps seem in correct position and orientation.

Perhaps, which can confuse anyone, is the fact that the way to print their values ​​varies from the 47uF ones to the 22uF others, as they seem from different brands.

BTW, did you find useful the info about that GAL reprogramming - IDE hack that I've posted before in reply to your request ? If you Want I can post here some benchmarks as soon as I can . :)


Here goes some Before-After Higher Res. pics:

caps_before.jpg


After:

Caps_after_.jpg


Bye!
 
Hi,
great work, your PCB looks like new (y)

Could you do a better pic from the area of C433? I am not sure but I think there is something between pad and via.

Benchmarks are always welcome :)

Best regards

FD
 
@Fieldday

That track got broken in the replacement :Doh: , so what you see there it's that track fixed by a tiny wire and soldering, as this track goes to that via, perhaps don't look a very pro fix but it works, continuty checked and is ok :)

This pad was barely sitting on air, maybe due to electorlyte corrosion to the pcb composite, when we desoldered this capacitor the track got bent.

Bye!
 
Ermm, didnt anyone else notice the bit about faster, PIO2 compliant IDE??!

How is this done? Does it work on your board?
 
Ermm, didnt anyone else notice the bit about faster, PIO2 compliant IDE??!

How is this done? Does it work on your board?

Already explained in post #10 ;)

Summarizing, it consist on a reprogram of one of the mobo's PALs (sorry, I've called them erroneously GALs) resposible of driving the IDE port logic, particularly the one at position U902.

But this hack wasn't done by me (please note that I have not the necessary skills) and unfortunately no source code was ever released to the public by the guy responsible of this.

Just googling around I found this message from a Polish amigan on EAB who have done something practically identical (this one varies in reprogramming two PALs instead of one, U901 and U902) and he published the docs and JEDEC files for this hack.


just this post here : http://eab.abime.net/showpost.php?p=603519&postcount=39

on this thread at EAB: http://eab.abime.net/showthread.php?p=603519#post603519


This kind of IDE PIO2 hack works flawlessly on my board and been doing it from years, since 1999 or some such , transfer rates get around 4 MB/sec on a 060@66 configuration.

I'll post some benchmarks when I have some spare time to put my A4000 in running order again, perhaps next monday.

Hope it helps. :)
 
Last edited:
I just managed to do two quick Benchmarks today:

Sorry for the bad quality but I haven't enough time to mess with 1084S and camera settings.

Done with the so hacked onboard IDE and a seagate 120GB hard disk, under Amiga Os3.9, with Idefix software patch and on a SFS partition.

Sysinfo:

IDE_PIO2_1.jpg


SysSpeed:

IDE_PIO2_2.jpg


Bye!
 
Last edited:
Back
Top Bottom