spanner
New member
I got a Tapuino kit V7.2 R2 from Amibay and put it into a CN2(Can't keep on calling it a datassette all the time,its a lot to type when you have to say it a few times)but I wanted to keep it looking like a real CN2 so that meant keeping the keys,Rec,Play,Rewind,FFwd,stop and Eject.the only keys I need are Play,Rewind,FFwd and Stop for the 4 Buttons.
You have to put the board from the kit after you have soldered all of the components on the board under the keys of the CN2
See pic 1..

To Fit the board in the right place in the CN2(easier than saying Datassette all the time..") ) you have to remove one of the pillars that screws the CN2 together,its in the picture, the bottom right pillar,you could cut it with a hack saw or you could cut a notch in it so the notch is the same depth as the board.
) you have to remove one of the pillars that screws the CN2 together,its in the picture, the bottom right pillar,you could cut it with a hack saw or you could cut a notch in it so the notch is the same depth as the board.
so all you need to do is copy were mine is in the picture,you need a bit of cardboard and black electric tape and put the tape over the cardboard,cut the card so its one side of the board to the other,I made mine abit to big but it don't matter.
See Pic 2..

You need this because it like a guard to stops the keys from slipping of the buttons.
I have stuck down the board with blue tack,yep handy stuff..") ,its so you can move it and make sure it in the right place.
,its so you can move it and make sure it in the right place.

Then the keys will work properly and press the buttons everytime.

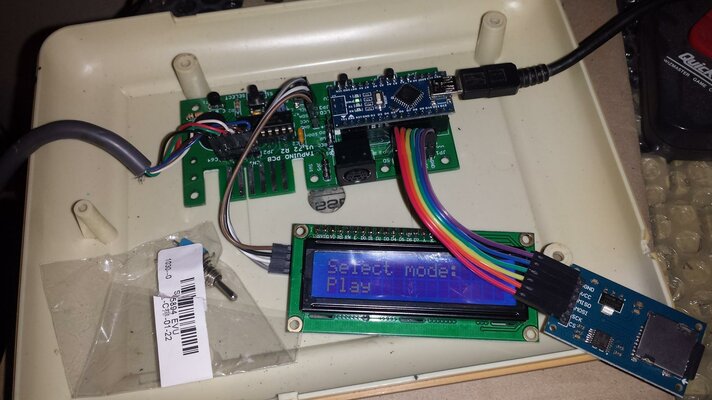
This is the top part of the CN2 where the LCD goes,its where the tapes would go,cut out a hole so its the same size as the LCD so it fits tight.
The switch is on the right but will be on the right above the counter.The switch is for the sound to the speaker,middle is off down is on but low sound and up makes the sound louder.but can be the other way round depending on how you have the switch plunged in.
Don't forget to make a cable so it will connect to your C64,its in the instructions on SPCBM Google Drive.
Once you have done everything and flashed the firmware,you will be good to go.
Then it will look like this.


I have changed some of the code in the firmware,with permission,to change the button layout to match the layout of the keys on the CN2.I am not sure if I can share the firmware with the mod in it yet,I let you know ASAP.
There is a video here of the CN2 Tapuino in action..
Hope you enjoy your new CN2 Tapuino.. First project I have done and it look sooo nice.
You have to put the board from the kit after you have soldered all of the components on the board under the keys of the CN2
See pic 1..
To Fit the board in the right place in the CN2(easier than saying Datassette all the time..
) you have to remove one of the pillars that screws the CN2 together,its in the picture, the bottom right pillar,you could cut it with a hack saw or you could cut a notch in it so the notch is the same depth as the board.so all you need to do is copy were mine is in the picture,you need a bit of cardboard and black electric tape and put the tape over the cardboard,cut the card so its one side of the board to the other,I made mine abit to big but it don't matter.
See Pic 2..
You need this because it like a guard to stops the keys from slipping of the buttons.
I have stuck down the board with blue tack,yep handy stuff..
,its so you can move it and make sure it in the right place.Then the keys will work properly and press the buttons everytime.
This is the top part of the CN2 where the LCD goes,its where the tapes would go,cut out a hole so its the same size as the LCD so it fits tight.
The switch is on the right but will be on the right above the counter.The switch is for the sound to the speaker,middle is off down is on but low sound and up makes the sound louder.but can be the other way round depending on how you have the switch plunged in.
Don't forget to make a cable so it will connect to your C64,its in the instructions on SPCBM Google Drive.
Once you have done everything and flashed the firmware,you will be good to go.
Then it will look like this.
I have changed some of the code in the firmware,with permission,to change the button layout to match the layout of the keys on the CN2.I am not sure if I can share the firmware with the mod in it yet,I let you know ASAP.
There is a video here of the CN2 Tapuino in action..
Hope you enjoy your new CN2 Tapuino..
First project I have done and it look sooo nice.Attachments
Last edited: