A4000 caps mess

  • Thread starter Thread starter lostrego
  • Start date Start date
  • Replies Replies 10
  • Views Views 2377

lostrego

Member
AmiBayer
Joined
Apr 4, 2011
Posts
722
Country
Spain
Region
A Coruña
Hello all there.

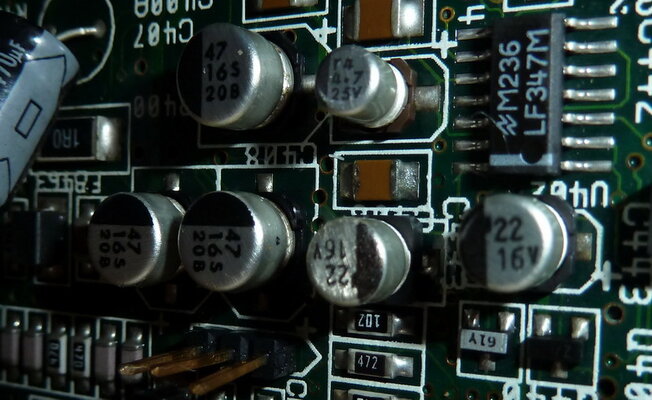
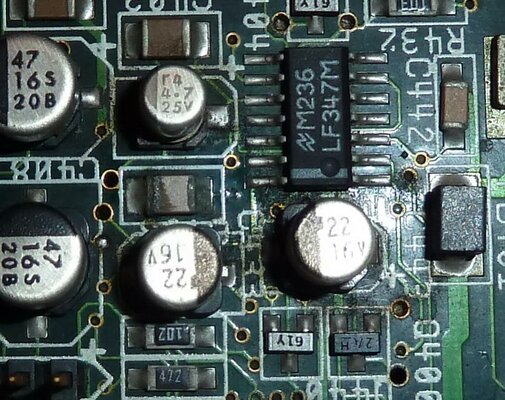
I'm now to start a restoration of my old A4000, with caps replacement and such and I´ve found that those damm 22uF audio caps seem to be leaking...

However at first sight seem to be no damaged circuit traces (let's hope so) and strangely (besides a bit funny) the audio quality wasn't affected at all during these years.

Well its time to sort all this mess, a friend of mine believe that simply cleaning that area with isopropyl alcohol, once removed the old caps, must be enough to stop the corrosive effect of the electrolyte but I personally think that this isn't enough. Any other suggestion of how can be stop this corrosion?


Below is a pic of the damaged area. Any hint will be apreciated , thanks.:)
 

Attachments

  • 0121corte.jpg
    0121corte.jpg
    136.6 KB · Views: 5
I've used IPA with good results, if that doesn't cut it a little baking soda and an old toothbrush should be enough. While annoying, electrolyte (a weak acid I believe) isn't as dangerous or destructive as NiCad leakage.

FWIW, a few of my own boards I repaired many years ago that suffered capacitor leakage still look great, just cleaned with the above means.
 
The electrolytic is an hydroxide. A mild acid will neutralize it, but even IPA brushed on the area then washed away will set the board problem-free.
 
Thanks a lot Damion and rkauer .:)

I've done some cleaning around this area before caps removal and fortunately no damage seem to be done to circuit tracks, at least at simple eyesight.

Another doubt that comes to me was about cleaning all crap around the rest of the board, I'm cleaning it with a wiper, cotton swabs and IPA, but It's getting a real pain in the ass cleaning it in that way, with so many small recesses between components and such, so I'm thinking on a more drastic and quicker way...

The doubt comes to me of what method should be better, some claim that with tap water and gently brushing it around should be enough (and after letting it drying out for about 3 days or so) , others claim that It's better using distilled water, some others claim that the better option is that no water at all should be involved and better using some non oleic contact cleaner product (thing that I´ve done in the past with aparently good results) and so on...

So I´m a bit worried of what should be the best option to go instead making a wrong decision.

Any clue?

Regards.
 
A little compressed air, then I do what you're doing. I use small amounts of distilled water and an anti-static microfiber cloth. (Cotton swabs are handy too, but they're a PITA - the strands get caught/stuck everywhere.) People have great results with the dishwasher, I just don't do it because I like preserving the original motherboard stickers (silly, I know).
 
If you are afraid of using tap water or a dishwasher (I used both methods with total success), immersion on a container filled with IPA and then an used SOFT teethbrush will solve your problems.
 
Again, Thanks to both :)

As I don't have an air copressor and the dishwasher thing seems to me a bit drastic, I finally decided to clean some very dirty or suspect to cap leakage areas with IPA (as I don't Have very much ATM).

And then the rest was washed with a toothbrush and distilled water (well after removing the RTC clock battery, as I suddenly realized that wouldn't be a good idea messing up water with live 3.6V tracks around the board when I just was starting to clean it all , I hope that nothing got screwed up :whistle:)

Now It's drying up and I´ll let it doing that along this weekend until monday or so to start the re-cap.

There goes another pic of the same audio caps area, looks much better now.

:D

Regards.
 

Attachments

  • P1010132corte.jpg
    P1010132corte.jpg
    73.1 KB · Views: 5
No, it is not better: the 4.7 & 22uF capacitors surely leaked.
 
Well, perhaps I express it wrong, I said better assuming that this only was some general mobo cleanup before doing a replacement of all mobo caps...

Of course no one doubts that those caps are damaged and need to be replaced ASAP, thing that I'll do next week, I already have all needed new caps here to do so . :)

Regards.
 
Just an update:

Finally I managed to do a general cleanup, replace all mobo caps, and all gone fine, except for a pair of those 22uF audio caps, as all around was in a worst state than seemed at first look.

As the leakage done its nasty corrosion thing, the track pads there became ultra-fragile, so one track got broken in the process, but nothing than a tiny wire and some soldering can't solve.

So there go a pair of pics one from the damaged area and another one of the whole now-shiny board :D

PS: Due to lack of spare time this mobo has not yet been tested, tomorrow will know if everything gone ok or something goes BANG, let's cross fingers and wait.

Maybe I should open a new thread on the photo booth of this whole restoration process. :)

Cheers and thanks everyone for your help.
 

Attachments

  • P1010925_res2.jpg
    P1010925_res2.jpg
    84 KB · Views: 5
  • P1010928_res2.jpg
    P1010928_res2.jpg
    173 KB · Views: 5
Last edited:
Well, as said, I tested it and good news, everything goes ok!

:D

Has been running demos during two hours or so to trash the hell out from the custom chips a verify overall stability and goes solid as a rock.

Now is time to face with a rusty chassis, overhaul the PSU, doing some retrobrigth to the front panel an such, I'll have work for a while. :dry:

Here goes a pic of it running with some "newspaper covered kitchen table" below, heh.

Cheers.
 

Attachments

  • P1010942_res.jpg
    P1010942_res.jpg
    86.6 KB · Views: 6
Back
Top Bottom