any 1 help make this pcb design better?

ShambleS1980

Softmodder/Tsoper/Repairer of old xboxes.
AmiBayer
Joined
Jul 20, 2011
Posts
2,979
Country
Wales
Region
Gwynedd
Ok.
So it should be straight forward because im kind of like that any way..

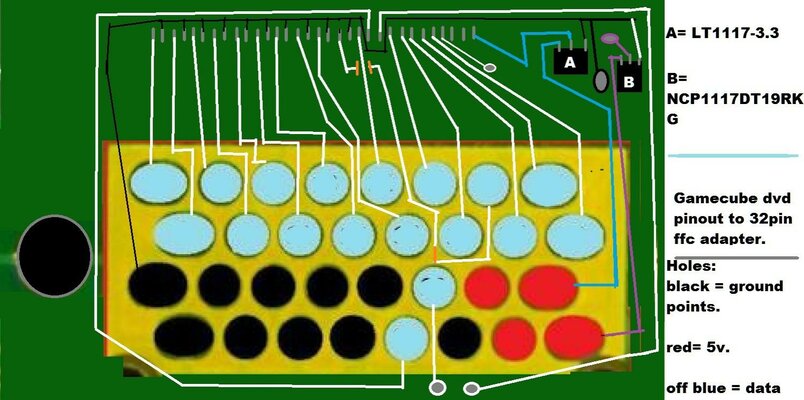
I noticed when modding a game cube that the whole shebang would be a 100x easier if 1 simple pcb was made..

This is my basic "and i mean really basic" design of the pcb that needs to exist so the install of a wiikey or wode etcetera takes a few minuets..
and even the most inexpirienced solderer should be able to do it..

the pcb should power the wiikey, ground it. supply data. have pads for eject switch. and a 1.9v source for wii drive replacment eject button

if made to the scale of the actuall pin holes on the game cube.
the whole thing should be able to sit flush on the bottom of the board and not get in the way of anything..

ANY way..

here it is..

please can you improve it for me some 1.. This is not my area.


-=Edit=-

i missed out 1 trace in the 1st pic i uploaded. i now added it in. But with the curent setup It has to pass under an existing trace.. "i marked it with 2 orange lines"

im sure if i spent longer doing the traces i could get them all on 1 side of the pcb.

Any way Hopefully some one can make a nice simple design of that..
because thats about the limits of my pcb design skills.:double
 

Attachments

  • GCwikiPcb.jpg
    GCwikiPcb.jpg
    146.3 KB · Views: 2
just a heads up, megalomaniac on gc-forever forum does make an adapter like the one you are describing and he is calling it "MEGAdrive", here is a photo of mine installed:


it looks great compared to my previous wire installation:


the downsides are 2 atm: it costs 45$+shipping and is currently out of stock.... more to come though as he announced today

totally worth it though IMHO, I had a wire connected wrong and thought I had a bad wiikey fusion chip... by the time I realized that the adapted arrived and I just installed it... (that's why I had the extra wkf to swap with you ... one swapped dataline can drive you mad! lol)
 
hmm..
seems a lot of money..
and its sitting on top of the board.. which "to me" defeats the point.

i think it should solder to the Bottom.. so you dont have to remove anything..

if its top mounted then "IMO" it would be better if it was like a dvd drive connector and slid in to the existing dvd drive port..

I also dont see where he gets 3.3 and 1.9v from..

BUT i guess it wont be long for them to change it. and will be way before i ever finish getting anything sorted lol.

Still think my way is better.. but I think that i would lol..

think il post this over at gc-forever.com maybe they will make something with it.
 
The wkf gets 3.3v from the small regulator on the MEGAdrive... 1.9 you have to provide from a source on the mobo. TBH it's not that importand since megalomaniac also discovered wkf-autoboot and we have swiss loading automatically... so now it's only needed for games that are 2+ discs.

The whole custom plug idea was discussed as well, it costs way to much to be viable.
MEGAdrive is not bad, it also comes with a small adapter that plugs in the GC dvd so you connect it via fpc cable to the wkf, it works great!


^ on the other side there is an fpc connector to connect to the wkf , the 2 cables are VCC and audio-stream, that fixes audiostreaming via wkf that sits in the middle between the mobo and the dvd (another of megalomaniac's discoveries)

The end result is something looking like this:


I've been told that the wkf fits under the dvd but haven't bothered to relocate ...
 
ok found some time..

so i made an adapter thing.
(using a ffc breakout board from keropi) and an old game cube dvd drive pcb
I basically cut off the dvd connector and super glued it to the ffc breakout board Then solderd wires to the legs on it

(PROBABLY IMPORTAINT TO NOTE I LEFT SOME OF THE DRIVES PCB ATTATCHED TO THE CONNECTOR)

that way the pads were still there and i could glue it down...

I had to add more solder to the legs.
i found it easy enough provided there was plenty of flux..

This should probably be the Easiest install method for people. "if any one makes one"
but it is way too time consuming to make in bulk for sale at home, and you would need the dvd connectors So unless you had hundreds of broken game cube dvd's probably isnt viable..

any way
here is what i ended up with..
had to upload it to imageshack.
Forum dosent like my pictures says they are to big lol.

I left the little wiering diagram that i made for referance up there. obviously the pin outs for the male dvd connector are numbered in the way i would have seen them when i was soldering them.. Not how the pins are when its actually installed.. same goes for the break out board.

if your doing the same your self, please bear that in mind..

also i found it easier if most of the wires wraped around the board and connected at the back.. 2 main reasons for that.. the 1st one was to stop wires crossing eachother all over the board. (as you see 1 on the dvd connector is far right and 1 on the fcc board is far left.)

"i could have made it much more straight forward, and wires be shorter and more direct if i desolderd the fcc connector then fliped the Fcc connector over, but still to the same side of the breakout board, so it faced the other way. it would have also made the Wii key fusion plug in facing upwards not down. I may possibly do that at some point. it would make everything more compact and straight forward. and mostly 1 on the ffc would have been directly adjacent 1 on the drive connector "

the second is simply a matter of i didnt want a huge clump of a tangled mess of wires preventing the adapter thing plugging in because the heat sink was in the way.

I found it best to check that all the legs were still independant "no bridges" every 4 or so connections i made. "probably beter to check every time a connection is made"
I managed to cause 1 bridge when i was connecting the side with the most cables. "flux and desoldering brad fixed it"
and then i also Incredibly managed to bridge the only 2 connections on the other side.
this was simply because i could see the light at the end of the tunnel and rushed it.
Again desolder braid and flux fixed it..
I should have spent the extra 4 seconds to make sure i was steady with good arm rests before i solderd them. but hey ho. i knew better and still di it any way.. for the sake of 2 seconds it had to spend more like a minuet to de solder them then re solder them so i had enough solder to solder on to.


Uploaded with ImageShack.us
 
Last edited:
awesome! will you also have a dvd drive? it would be great because as it is atm, if there is an SD on the wkf slot you get swiss, else you get dvd functionality like a normal gc ;)
 
I wont have a dvd drive. was never making it to have one.
but i can easily plugin a wii drive later..
its just a matter of plug it in to the dvd connection on the wiki fusion.
the Switches are already there, decided to add the switch and not just ground it out simply because i may later want to use a wii dvd drive. which should be easy enough to find online in fully working order. compared to a game cube one.

one thing i do like about this is i can swap it out of one gamecube to a diferent one easy.
there is 3.3 solderd to the chip. a ground solderd to the chip.
1.9v solderd to a switch and a ground solderd to a switch.

everything els is solder less (just plug it in)
 
Back
Top Bottom