FAO Anagrama - Retr0bright Work In Progress

  • Thread starter Thread starter Merlin
  • Start date Start date
  • Replies Replies 24
  • Views Views 529

Merlin

Ministry of Retr0bright and Street Judge
VIP
Joined
Nov 24, 2007
Posts
15,602
Country
UK
Region
Manchester
The story so far........

Anagrama dropped off his A4000parts to me for some Retr0bright love. His A4000 machine is prized, as the former owner of his A4000 was none other than Microprose! :wooha: :bowdown:

This is why he wanted his machine restored by an expert in the process and I can fully understand why.

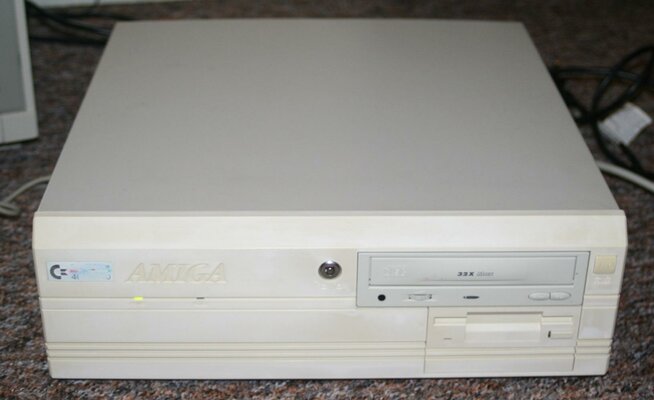
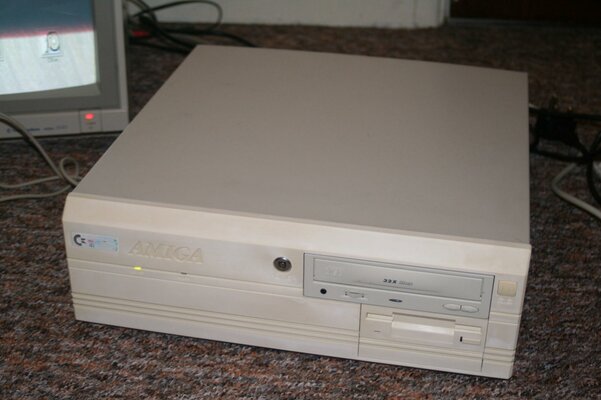
OK, so this is what his parts looked like before I started.

IMAG0127.jpg


The front fascia looked like it had kidney failure. I set to work and this was the result after about eight hours.

IMAG0128.jpg


The keyboard was restored but the front wasn't anywhere close. Another eight hours got me to this point:

IMAG0130.jpg


It's close, but if you look closer, there is still some slight discolouration, particularly in the grooves.

IMAG0131.jpg


So far, the plastic has shown no signs of 'blooming' at all. My mixture is based on 10% H2O2 with a heaped teaspoonful of Xanthan Gum and one teaspoonful of Glycerine, with 1/4 teaspoonful of Oxy added in. Slow is definitely the way to go with badly discoloured items like the front fascia.

The question for Anagrama (and others that may wish to comment) is this; do I treat the fascia one more time, or leave it as it is?

The keyboard and other parts are restored fully and I'll leave those pictures for Anagrama, once his machine is fully re-assembled.
 
Last edited:
Marvelous Work Merly :bowdown:

I'm tempted to send you my A4000 Keyboard plastics to retr0bright

TC :cool:
 
I think stopping in time and not wanting 100 % result is important.

From my personal experience affected yellowed areas bleach more then unaffected areas (eg where a floppy cover was) On my A3000 the yellowed has become whiter then where the plastic floppy cover was protected and it did not need retrobright... I would have expected it to be whiter, no it is more yellow. So you might wan't tot stop it...
 
My thoughts exactly, Jurgen, you must have been reading my mind. That's why I am giving Anagrama the option to choose, if I stop now or carry on for another treatment.

My plan is to only treat the grooves and discoloured areas, as I can do this with the gel and a small brush, or a cotton bud for the grooved areas.

Edit: On reflection, I may treat the fascia one more time with a lower concentration, e.g. 5% H2O2. This will minimise the risk of 'blooming' occurring. I'll wait for Anagrama's comments first though.
 
Last edited:
Personally I would still continue a little bit with the recessed areas; otherwise the front panel might look "dirty" even though it's perfectly clean. An even result should be aimed for in my opinion, even if some overall yellowing does remain.
 
Well, I've given it another treatment with a 5% mix and it really looks the shizz now.... ;)

Pictures will follow tonight.
 
OK, as promised, here are the final results. I am not going to push this any further for fear of causing 'blooming' and damage to the fascia. To be fair, the fascia is a more than reasonable match for the keyboard now and the only discolouration present that is really noticeable is on the sides of the fascia and I would suggest that Anagrama masks these off and touches them up with an acrylic paint of a close colour to the plastics.

IMAG0134.jpg


IMAG0133.jpg


Not 100% but darned close if you ask me. They actually look better 'in the flesh' than they do on these photos.

@ Anagrama

I'll re-assemble the keyboard on Friday evening and PM you when the parts are ready for collection.
 
I am not a chemist Merlin, but it looks great. I am happy with retrobright as well. It is not perfect, but it is a real miracleworker:thumbsup: I use just the product these days with a little rainwhater nothing more.. The plastic and glue stuff, charactorizes, lines, marks, etc..(like wood)

It just works, I wear protection. (hands, clothes,glasses) I somethimes just repaint with plain whater while it is not completely dry.
 
I have noticed that the blue colour from the case badge has taken a hit, but I'll retouch that (and the other colours) up before Anagrama comes to collect it.
 
Merlin, did anybody ever tried to sand it down the plastic lets say using water sand paper?
 
Would it get too rasta-like if you painted the grooves in the facia the colors of the Amigalogo?
I used a permanent marker on the grooves in a c64c once...didn't like the result.
hehehe thruglow strands with a led on each end might do nicely :)

Grtz, PymerOne.
 
@ Memphis

No, because if you sanded the surface, you would lose the textured surface that the Commodore Amigas have on the plastics. The same would apply to Magic Erasers, as they are nothing more than foamed-up melamine and are also abrasive.

Retr0bright has always been about treating the surface without damaging it wherever possible.
 
so how everything turns yellow, because of light? or when sun hits the computer from outside, been wondering....
 
Thanks, Adrian.

so how everything turns yellow, because of light? or when sun hits the computer from outside, been wondering....

The answers you seek are at the Retr0bright Wiki... I researched this along with rkauer, Zetr0, tonyyeb, Chiark and a few others from around the World... it was a truly global effort. It's all down to the brominated flame retardant that they used in the plastic back then. The Germans at a1k.org discovered the use of peroxide; we took it to the next level and optimised the process, as well as defined what was going on at the chemical level. It's extreme Chemistry.

www.retr0bright.wikispaces.com

There are truly epic threads on EAB and VCF about the progress made in developing Retr0bright. The links are in the Further Reading section of the Wiki.

Enjoy!
 
Last edited:
Great Job Merlin! I hope to have the courage to attempt this over the summer on my Sons A600 case and keys, its only light yellowing, so shouldn't be too hard. I just don't get on too well with dangerous chemicals :D
 
Well, it's Friday evening and the keyboard and other parts are all re-assembled, awaiting collection by Anagrama. I've retouched the colours on the keyboard badge and they look spot on now.

The floppy drive faceplate and button also match the case now. :thumbsup:

I'm going to leave the final 'reveal' pictures to Anagrama, as they should really be of the finished machine, once it's been re-assembled. It's gpoing to look the absolute shizznit / dog's danglies / mutt's nuts / canine's cahonies, etc. etc. ........:nod:

@ Anagrama

The red sticker under the case wasn't damaged at all; you may want to take a picture of this special sticker as part of the 'reveal'..... (hint) ;)
 
The final result!

As you can see from the original pictures this work is quite impressive! Unfortunately I tried to remove the colours from the case badge, i was hoping they would wipe off and leave a near faint image but stupidly it went everywhere and I made a mess of it :Doh:

Pictures of the keyboard to follow - There brilliant!

Well sadly after some long and hard thinking I have decided to let the fascia go with another A4000 I have spare. This weekend (as you know merlin) I picked up another A4000 which was in as new condition, so ill be using the faceplate from this for my newly refurbed A4000. Im hoping someone else from the forum will be able enjoy Merlins work as much as I have appreciated it :bowdown:

I just need to put everything together now with the systems and dig into the Micropose hard drive .... Information to follow

Any anyone thinking of doing some retrobrighting - Go for it! Just be safe :thumbsup:
 

Attachments

  • IMG_2002.jpg
    IMG_2002.jpg
    89.5 KB · Views: 3
  • IMG_2005.jpg
    IMG_2005.jpg
    140.3 KB · Views: 5
Back
Top Bottom