replacement switch for cm8833 mk 2 or 1084s-p1

  • Thread starter Thread starter roy_bates
  • Start date Start date
  • Replies Replies 16
  • Views Views 548

roy_bates

resistance is futile!
VIP
Joined
Dec 18, 2011
Posts
8,908
Country
england
Region
birmingham
as in title i think i can get replacement mains switches for these monitors but there is a minimum order,which means i have to order six at a time.

they are not exactly the same but i reckon i can modify them to work in these monitors without much hassle.
after modifying them they should be a drop in replacement...
would anyone like some? say 4 as i only need two.

six would cost me about £18 with the shipping so i would have to sell them on for £3 each.

and you will need soldering knowledge to replace them,and you NEED to keep the metal plate off the front of your old one the one it comes with doesent look like it will fit back on the board.


i didnt know where else to put this,so if its not allowed please close it.

what do you think? i dont need 6 of these.

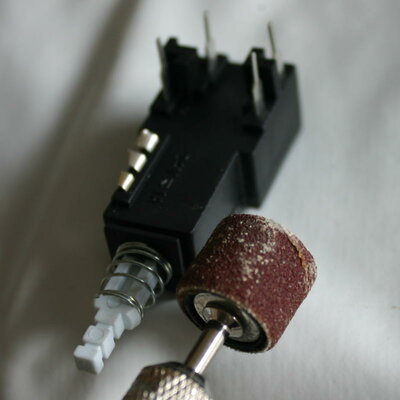
the original part is a PREH ME5A


this:

picture.php


picture.php


if none is interested fair enough i'll get six anyway.
 
Last edited:
after a few emails back and forth with a supplier and engineer talking about technical specs of the replacement,i will be sending another picture of the unit with the pin spacing and critical dimensions for comparison.
this is important however,i dont want to be lumbered with switches i cant use on anything.as the replacement has no measurements for comparison in the pictures(even if it looks the same minus modification).i must be sure it will work before i buy six to fill a minimum order after that it wont matter.
electrically its exactly the same,im only worried about physical dimensions now.
 
let me know how it goes..
I'll help take a couple (or the lot of 4) off your hands..

Edit: I'll take 4 :-)
 
Last edited:
let me know how it goes..
I'll help take a couple (or the lot of 4) off your hands..


i'll let everyone know mate.and your welcome.

if there is enough interest i can get them for a about £2 but i think i would have to order about 20-30 units for that.

but i want to order six at the moment..
 
Last edited:
it seems i can get an exact replacement for these and have a choice of two.(there was three but that had solder tags so its of no use)
which made a total of 4 choices in the end
unfortunately these are £5-£6 a pop.(with shipping it would probably go up to £8 a piece roughly).
so that leaves 1 in the end.
i'll stick with the ones im looking at(and modify it after) on price grounds pending pin spacing and physical dimensions(sent via email) and availablity.

first order will be 10 units to cover everyone so far in this thread,i will wait for an answer from them first(suppliers) then they can process the order.


i will probably show how to alter these step by step for use in these monitors its not hard.
and partially modify them my end before sending them out to all involved(so its less work on installation).on request.

EDIT: order confirmed and 8 units available pending dimensions.(two extra units will be sent at a later date for a total of ten)
 
Last edited:
parts are on there way to me.


please can all interested party's please send me a pm with your address for postage and i will reserve them in a sales thread when the parts arrive.

i will make a small guide for these when the parts arrive and post the pictures here.

thanks to all.
 
You'll notice this exact switch is also available with an internal 200mA fuse incorporated. Avoid the fuse one like the plague!
 
You'll notice this exact switch is also available with an internal 200mA fuse incorporated. Avoid the fuse one like the plague!


as far as im aware the ones im getting dont have any such fuse in them.
200ma wont be anywhere near enough for these monitors.
but,i will check when they arrive.thanks:)
 
switches have arrived and as promised here is the guide:

#WARNING WILL ROBINSON#
oh nearly forgot.
be careful while replacing the switch as the monitor holds a massive electrical charge even while off for quite some time,so please discharge the screen and be careful lads while doing this...
as you will be dealing with the mains input end.

step 1
desolder the points shown in this picture making sure the legs of the old switch are clear and remove two fixing screws shown:
picture.php


step 2
hold the switch cap and pull off the cap and mains socket assembly from the switch shaft and move it out of your way:
picture.php


step 3
next,using a pair of long nose pliers bend back the clips on top of the metal plate to release the switch like so:
picture.php


step 4
remove the main body of the switch by lifting it upwards and out,so the space looks like this:
picture.php


step 5
put your new switch in front of you.
picture.php


step 6
locate and bend back the small clips on the front plate like the old one like this:
picture.php


step 7
pull off plate:
picture.php


step 8
turn over the switch and locate the front three pins to remove:
picture.php


step 9
remove these pins as shown:
picture.php


step 10
gently ease the new switch onto the old plate of the old switch while at the same time locating the pins into the holes on the pcb like this:
picture.php


step 11
gently but firmly bend back the small clips on the plate so it looks like this:
picture.php


step 12
while holding the cap and the mains socket assembly push it onto the switch shaft making sure it is on all the way like so:
picture.php


step 13
turn the board over and replace the fixing screws and solder the four points for the switch like so:
picture.php


then you are free to fully assemble the monitor as you see fit.and enjoy a switch with a working latch.
 
Last edited:
for me there'll be no reduction in the numbers.. so I'll stick with the 4 I pre-ordered :-)

just waiting for a final price :-)

and thanks for finding these
 
Some sanding is needed for the bracket (for screws) is needed for the 1084 monitor (switch is front operated)

the final result as pic nr 3, and the old switch as reference.

if it needs to be perfect some more sanding is required, but it works fine as shown on pic 3
 

Attachments

  • switch1.jpg
    switch1.jpg
    39.6 KB · Views: 2
  • switch2.jpg
    switch2.jpg
    21.6 KB · Views: 2
  • switch3.jpg
    switch3.jpg
    46.9 KB · Views: 1
  • old_switch.jpg
    old_switch.jpg
    30.5 KB · Views: 2
Last edited:
Some sanding is needed for the bracket (for screws) is needed for the 1084 monitor (switch is front operated)


nice work mate well done.:)


do you still have the old one for reference?

just one or two more pictures mate:lol:
 
Last edited:
Back
Top Bottom