Floppy - gotek sandwitch

  • Thread starter Thread starter SM1WZV
  • Start date Start date
  • Replies Replies 10
  • Views Views 1808

SM1WZV

New member
Joined
Apr 30, 2016
Posts
75
Country
Sweden
Region
Gotland
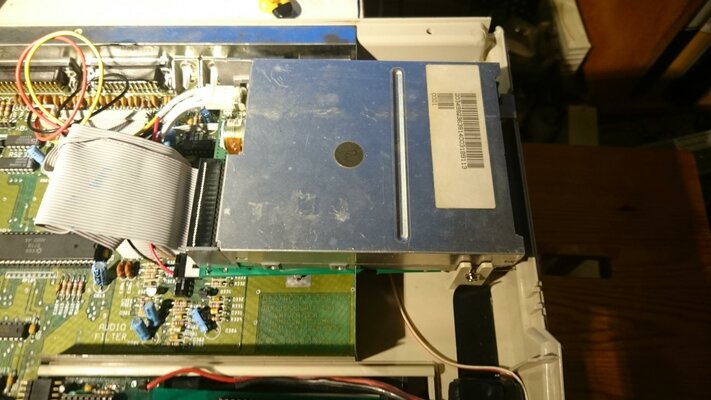
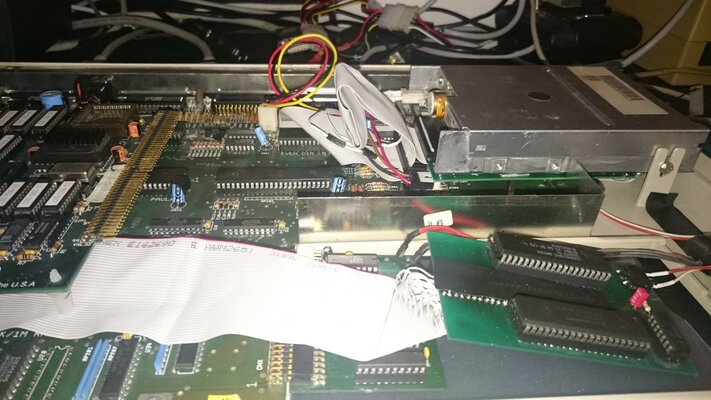
I was inspired by some Gotek -floppy installs shown here, and after restoring my slimline floppy. I though way not and starting to find a proper location for the Gotek. After some time I did found the best place giving me much free space in side my A500 --- below the floppy!

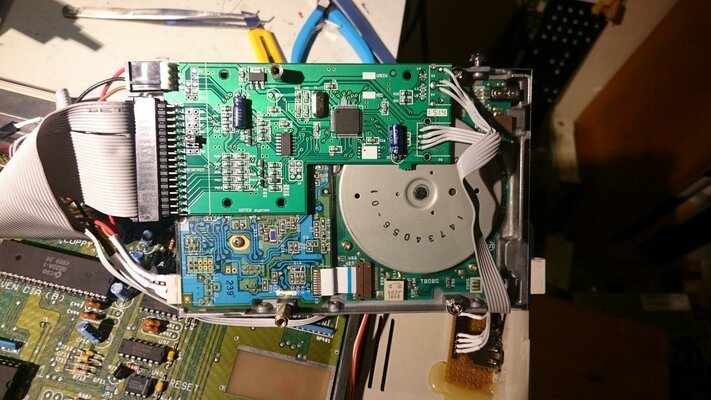
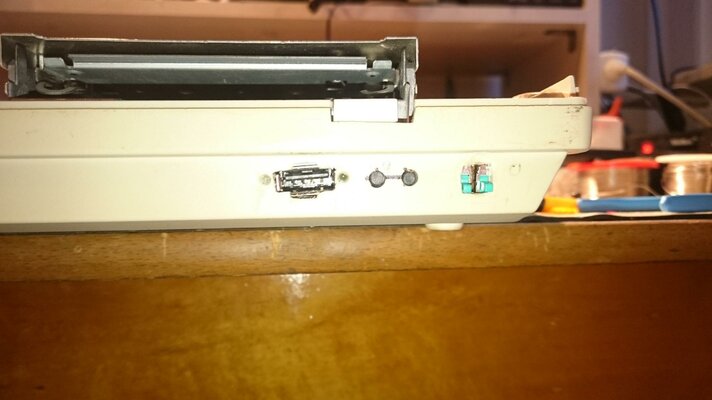
The Gotek had to be striped of some not needed components and remount of others, to slim it even more. A plastic sheet and a small stand off was needed to give isolation and clearance to the flywheel on the floppy. I did have a old hole from a slide-switch that fitted perfect for the USB outlet. A vero-board assembly with USB, buttons and pin-header was maid and hot glued in place. A new floppy cable with three connectors and a breakout of drive select 0 was made. I have a kickswitch so its selector switch had to be replaced so both drive and kick select could reuse the hole for the old kick select switch. Had two micro slide switches in the djunk-box, them did I place on a small vero-board and with pin-header connectors on cable for disassembly reasons. The setup no looks like a oversized 2way DIP-switch unit from the outside. And when top cover is on you can´t see direct that there is a Gotek inside sins I do not have a display.

Hope you enjoy my different setup of the Gotek drive.
 

Attachments

  • DSC_0100.jpg
    DSC_0100.jpg
    213 KB · Views: 2
  • DSC_0099.jpg
    DSC_0099.jpg
    190.7 KB · Views: 2
  • DSC_0098.jpg
    DSC_0098.jpg
    196.5 KB · Views: 3
  • DSC_0101.jpg
    DSC_0101.jpg
    203.2 KB · Views: 2
Jupp, I know but the big holes are done some where around 1991 -1992 using a high speed mini drill so the plastic have melted some <:-( so not much I can do to make them nice now... The two small holes for buttons are done in present time and this time I only used a 1/4" socked drill bit and hand power, it gave a much better result as shown. There are some lines left from measurement of button holes that I have removed after photo session.

It´s your work that inspired me to this modification <:-) I will probably not make any more similar mounting sins I do not have any A500s to work with nor a A600/A1200 disk drive that this is based on, see closer on ejection button and you will notice a strange shape of it, drive was a replacement swap around 1996-1997, this was the second time I restored this drive to working <:-)

Ohh :) thanks jeje

Thanks for watch my articles also.

Regards.
 
:-) All published modifications are a source for learning and inspiration. Sometimes they might be like mine trying to reuse old and ugly holes in the casing... Perhaps hotglue and paint can make the old ugly holes less ugly ;-)
 
What's the big hole with the green squares? LED's, LCD?
 
What's the big hole with the green squares? LED's, LCD?

It´s the selection swithes for floppy/gotek and kickstart 1.3/2.04, there is no extra LEDs or LCDs in this build.
Should probably try to reduse the size of the hole some day...
 
I've bought some product that if it works as intended, could be interesting to you - I'll try to remember to tell you, but otherwise look out for an update on my usual thread after the weekend.

It's supposed to be easy to work from a tube, and dries after 24 hours as plastic and hard but very slightly flexible (as per ABS); then you can file/sand it down as required. It's white though... I'm going to re-spray the whole case with vinyl dye afterwards (colour matched to original Amiga colour) to make it all level and prevent future yellowing.

C
:-) All published modifications are a source for learning and inspiration. Sometimes they might be like mine trying to reuse old and ugly holes in the casing... Perhaps hotglue and paint can make the old ugly holes less ugly ;-)
 
Last edited:
Have been forced to redo some of the work of this mounting.
The tactile switches used ended its life after some 20+ years of service (old VCR scavenge) so fresh ones from the trash box was need. The onetime mounting solution using hot glue had to be removed and a new mounting solution was needed. After some tinkering and sawing&grinding the center holding block inside the old Gotek case has been freed and modified to hold the HID card in pace behind the ugly but some cleaned up hole using a gray/white Pastic Padding gel.

To this I did buy a Arduidno clock card with a TM1637 chip, a bigger version in same series chips used in Gotek displays. This LED card is placed inside my A500, leaning on RP501 and hold in place by ODD CIA. I do not move my A500 so much so no need to fastening it right now.
This placed is selected due to an old modification to fit a 1" hard disk. The lower bars in the ventilation of my top case are removed for a small section. Now the selection display can be viewed from outside when top cover is on, thru this section of the ventilation.
 
Hello,
good work guys! i have planned to do the same before, but one thing stopped me: i was unable to make both devices to work at same time (without switch, for disk copy purposes) internally. I ended up with external solution for Gotek and disk selector switch.. It's ok, cause now i have A1200, A600, A500, CPC 6128 and Atari ST, and all of them need an external floppy from time to time, so i can not build the Gotek in, or i need to buy more of them :)
Is it possible to connect both drives simultaneously? if yes - how? I was stumbled before on one solution: a small piece of wire is needed to add DF3 signal from External socket to internal, but i can not find this topic anymore....
regards,

Cook
 
Last edited:
DjCook, I did a small test during this install before adding the switch. I placed the selection jumper on Gotek as DS1 and on same strate floppy cable mount both drives. My A500 did regonize both as DF0 & DF1 and they was usable. Do note any external mouted drives vill deactivate the internal DF1....

Note shure about rerouting SELx lines from external connection to internal extra drive but it should be usable in the same manner, I.E. Remove SEL0 line in internal floppy cable after origin drive, and replace it with SEL3 line from external connection. This should fool the system to activate DF3, but do note I'm only speculating.

About Goteks, if you have like me a storage of used tactile switches and can live without a display you can search ebay for a bundel of striped goteks. I did buy 4 units for $20 exluding P&P, the Arduino clock display cost almost the same for a pair. One is mounted in this setup and the other one is movabel between ny A2000, A4000 and a external drive.
 
Back
Top Bottom