You are using an out of date browser. It may not display this or other websites correctly.
You should upgrade or use an alternative browser.
You should upgrade or use an alternative browser.
Found group buy to 68010
- Thread starter rkauer
- Start date
- Replies 149
- Views 21979
- Status
- Not open for further replies.
Geraldine
Re-discovering Amigas after a bit of an absence!
rkauer
Amiga fanboy
Don't despair! A quick solder job will attach the leg back in to place.
Let me check what pin #12 does.
---------- Post added at 12:43 ---------- Previous post was at 12:33 ----------
Hmm...
Pin #12 is BGACK, , which is an important/needed pin. You can resolder it easily with a minimum effort.
Use flux and a good lead solder.
Let me check what pin #12 does.
---------- Post added at 12:43 ---------- Previous post was at 12:33 ----------
Hmm...
Pin #12 is BGACK, , which is an important/needed pin. You can resolder it easily with a minimum effort.
Use flux and a good lead solder.
Geraldine
Re-discovering Amigas after a bit of an absence!
I think somebody already attempted this because there was already a little blob of solder on it. I think the plastic outer casing needs to be removed a little so that the pin and solder can get a fighting chance of staying connected. Perhaps taking the plastic coating back by a few mil would provide enough space, then I can seal it up again with epoxy.
Zetr0
Ya' Like it Retr0?
Ooh noo.... I hadn't noticed that, I just sent them out in the way they came.... I am truly sorry Gerri, if you want I can send you mine out to you on monday, I should be able to repair that one.
Geraldine
Re-discovering Amigas after a bit of an absence!
That is a very kind offer Zetr0, but that wouldn't be fair on you to give up a fully working one.
It's just my luck I get the only one out of the bunch with a dodgy connector. :roll: Arrrgh!! CPU connectors again! I thought I had seen the last of that fun with the A4k. oh:
oh:
I have to admit though, I have have never attempted to repair a chip in this way before, in fact anyway before!
If removing them I always thoroughly clean everything beforehand, so this has never happened to me.......... um, yet.
Zetr0, could you fix the 68010? I know you would do a lot better job than I ever could and as payment I could have a rummage through my miggy junk for any other bits you might need or pay you of course.
Also, if you can't fix it then no worries
It's just my luck I get the only one out of the bunch with a dodgy connector. :roll: Arrrgh!! CPU connectors again! I thought I had seen the last of that fun with the A4k.
oh:I have to admit though, I have have never attempted to repair a chip in this way before, in fact anyway before!
If removing them I always thoroughly clean everything beforehand, so this has never happened to me.......... um, yet.
Zetr0, could you fix the 68010? I know you would do a lot better job than I ever could and as payment I could have a rummage through my miggy junk for any other bits you might need or pay you of course.
Also, if you can't fix it then no worries
Geraldine
Re-discovering Amigas after a bit of an absence!
Advice Please
Advice Please
I am going to have a go at repairing this myself. But I have a question, how far back in millimetres can I remove the plastic cover before hitting anything that might damage the chip further? I was thinking of using a small dressing file to slowly remove about 3 to 4 mil of the cover around the broken leg, soldering it then use a blob of Araldite to seal it up again. If I managed to get this working again, I will be well chuffed, my first real bit of hackery!
Zetr0
Ya' Like it Retr0?
@Geraldine
I have experience in repairing these types of problems, A while back I repaired a D2C Wii DVDROM drive by removing some of the plastic coating on the D2C chip and then soldering onto what are essentially leg filaments - the pitch is a lot finer than a 68k moto I can say") .
.
I admire your go-for-it-ness, but if you get stuck or its going all Pete tong, then please let me help you, I truly feel terrible about not checking these before sending them =(
I have experience in repairing these types of problems, A while back I repaired a D2C Wii DVDROM drive by removing some of the plastic coating on the D2C chip and then soldering onto what are essentially leg filaments - the pitch is a lot finer than a 68k moto I can say
.I admire your go-for-it-ness, but if you get stuck or its going all Pete tong, then please let me help you, I truly feel terrible about not checking these before sending them =(
Geraldine
Re-discovering Amigas after a bit of an absence!
Zetr0, dont feel bad!  It's just my dumb luck is all. Hope everyone else's are fine
 ")
Anyways, if I am careful, I am sure all will be OK. Sometimes I have found, (especially where miggys are concerned :roll "going for it" is the only option. I have some solder with a flux core so that should do it. Its a fine solder but I dont know what rating it has, try it and and see I guess, but I will have to remove the remains of the botched attempt first. Inspecting the chip I cannot see any evidence of corrosion on either the broken pin or the other ones. Perhaps the person who originally removed it was a bit heavy handed.
It's just my dumb luck is all. Hope everyone else's are fine Anyways, if I am careful, I am sure all will be OK. Sometimes I have found, (especially where miggys are concerned :roll
"going for it" is the only option. I have some solder with a flux core so that should do it. Its a fine solder but I dont know what rating it has, try it and and see I guess, but I will have to remove the remains of the botched attempt first. Inspecting the chip I cannot see any evidence of corrosion on either the broken pin or the other ones. Perhaps the person who originally removed it was a bit heavy handed.Zetr0
Ya' Like it Retr0?
As a small guide you will need -
1. Fine pitch silver bearing solder 0.022
*click here for eBay.co.uk BIN £3.49 - free PnP*

2. Flux (paste or liquid)
*click here for 60g Laco Self Cleaning Flux - eBay.co.uk BIN £1.95 + £1.17 postage*

Method
After you have removed some of the the plastic casing, you will be presented with a wire filament as to where the leg of the chip should be.
from here you should place flux and a gentle blob of solder - don't leave the iron on the filament for more than 2 seconds or you could damage the IC.
now you have prepared a surface for your substitute leg to adhere too.
With a small set of tweezers, grapple the substitute leg and cover the leg in flux. from here mate the two parts together and then add heat from the soldering iron. remember to keep your touch time down and complete the weld within two seconds. if its not bonding come off the heat - re-apply flux and re-position the components and try again.
Notes
It is important to note that for this type of welding, there is not enough flux in the core of your solder - hence the need to buy some flux too =)
Its ironic I have had to do this to a 74F139N recently - earlier this morning in fact =)
Good luck with this Geraldine, if there is any way I can help, then please just let me know how.
1. Fine pitch silver bearing solder 0.022
*click here for eBay.co.uk BIN £3.49 - free PnP*
2. Flux (paste or liquid)
*click here for 60g Laco Self Cleaning Flux - eBay.co.uk BIN £1.95 + £1.17 postage*
Method
After you have removed some of the the plastic casing, you will be presented with a wire filament as to where the leg of the chip should be.
from here you should place flux and a gentle blob of solder - don't leave the iron on the filament for more than 2 seconds or you could damage the IC.
now you have prepared a surface for your substitute leg to adhere too.
With a small set of tweezers, grapple the substitute leg and cover the leg in flux. from here mate the two parts together and then add heat from the soldering iron. remember to keep your touch time down and complete the weld within two seconds. if its not bonding come off the heat - re-apply flux and re-position the components and try again.
Notes
It is important to note that for this type of welding, there is not enough flux in the core of your solder - hence the need to buy some flux too =)
Its ironic I have had to do this to a 74F139N recently - earlier this morning in fact =)
Good luck with this Geraldine, if there is any way I can help, then please just let me know how.
Geraldine
Re-discovering Amigas after a bit of an absence!
Hi Zetr0, snapped up that solder and flux, better to be safe than sorry with the right kit and thanks for the advice. 2 Seconds with the iron? Check! 
Geraldine
Re-discovering Amigas after a bit of an absence!
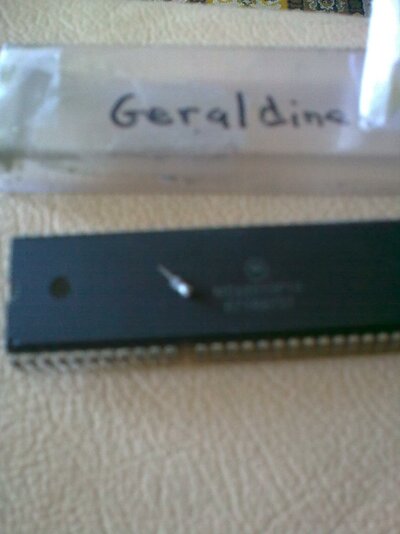
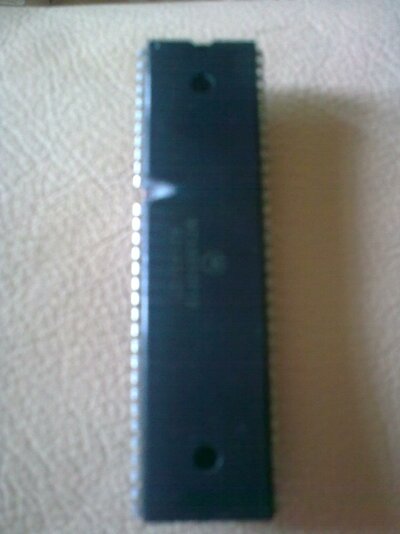
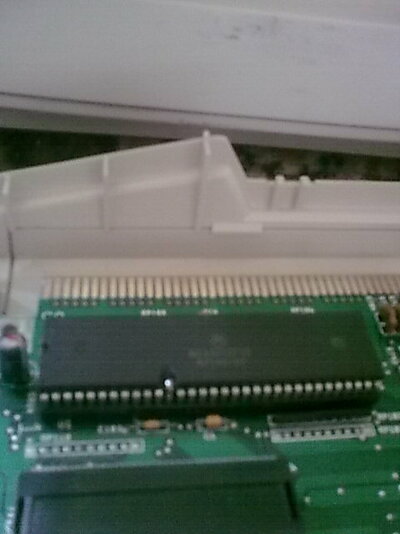
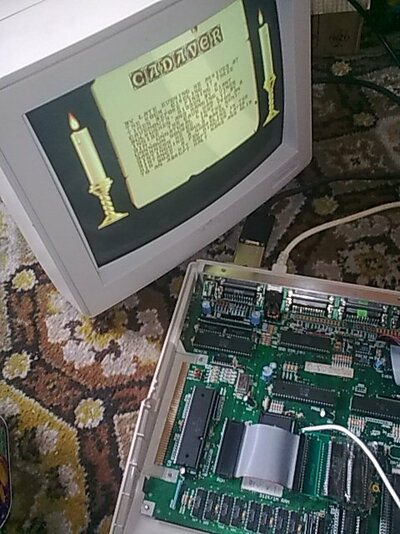
68010 Fixed!
68010 Fixed!
Well I cant believe it, I done it, I fixed it and it works!
Took ages to remove the plastic coating and quite a few attempts to secure the leg. Quality wise , Zetr0, Cosmos and others will laugh, but please remember that this was my very first attempt ever to fix a problem like this. Still to finally seal up the join with Araldite, but I am happy!
Going to replace the battery next with one of Jvdbossc's battery kits and finally wire in my new switch for the ROM switcher. That will be the 500+ finished...........at least for now :roll:
Anyways here are some crappy pics
68010 Fixed!
Well I cant believe it, I done it, I fixed it and it works!
Took ages to remove the plastic coating and quite a few attempts to secure the leg. Quality wise
, Zetr0, Cosmos and others will laugh, but please remember that this was my very first attempt ever to fix a problem like this. Still to finally seal up the join with Araldite, but I am happy! Going to replace the battery next with one of Jvdbossc's battery kits and finally wire in my new switch for the ROM switcher. That will be the 500+ finished...........at least for now :roll:
Anyways here are some crappy pics
Attachments
Zetr0
Ya' Like it Retr0?
WOW!
I am truly overwhelmed with joy!
In fact I have a huge beaming smile from ear to ear, this the best bit of news all week!
This type of soldering is pretty arty and very difficult, I am very proud and humbled by your effort!
the force is strong in this one!

I am truly overwhelmed with joy!
In fact I have a huge beaming smile from ear to ear, this the best bit of news all week!
This type of soldering is pretty arty and very difficult, I am very proud and humbled by your effort!
the force is strong in this one!
- Status
- Not open for further replies.
Similar threads
- Replies
- 63
- Views
- 3K
- Replies
- 0
- Views
- 88
- Replies
- 431
- Views
- 50K