I'm no electronics expert by any stretch of the imagination, I've had a look a few times at investing in a 'proper' soldering station but for how little soldering I actually do I've just never bothered buying a better one. Plus more importantly my end result always looks pretty acceptable, I don't have a photo of the underside of the board but none of my soldering joints stick out like a sore thumb, all the caps are straight, no ugly looking blobs of solder.etc
Ah cool, good to see people are still opening shops up like that! Seems to be a lot of this sort of stuff going off in Sheffield, I recently purchased a screen for my Akai S950 sampler and realised one of the bigger sellers on eBay selling replacement/re-designed LCD displays for loads of old (80's/90's) keyboards and studio equipment lives on City Road of all places lol.
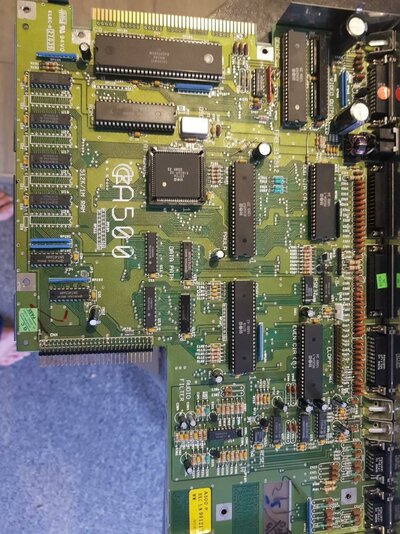
Yeah so (in general) with capacitors, the
[FONT="]microfarads (µF) must be correct for the circuit in question, the voltage again must at the very least match the voltage of the original spec, but there's no issue at all in fitting an [/FONT]electrolytic capacitor with a higher voltage than the original. in fact especially with older electronics they can actually benefit from this as to save costs when designing circuits manufacturers will often use the minimum they can get away with, to us this is a difference of a couple of pence but obviously when you are buying literally millions of the things, this can soon start to add up.
When a capacitor is capable of a higher voltage, it's basically under less stress. The only downside to this is the higher the voltage, the bigger the physical size of the cap. This is especially noticeable the 2x larger (3000 [FONT=Open Sans, Arial, sans-serif]
µF I think?) capacitors at the top left of the board near the video output. However whilst all of the capacitors supplied by RetroBench are intentionally of a higher voltage, they do all fit without fouling other components. [/FONT][FONT=Open Sans, Arial, sans-serif]
The 5 year old capacitors you already have are probably fine in practice, but manufacturers do put a shelf life on these (usually 2 - 3 years). So for how cheap they are, personally I would throw them out and buy fresh ones.
Just be sure to buy from a well known supplier, and a tried and tested brand like Panasonic or [/FONT]Nichicon rather than the cheaper no-name brand ones you often see on eBay for example.
I guess some tips would be:
- Take your time
- Don't have your iron too hot
- Make sure you have a way to clean the tip (wet sponge)
- Have a pair of quality wire snippers
- Don't leave the iron resting on a pad for too long whilst removing components, the heat will start to conduct in the PCB tracks and will eventually cause damage to those, or to other nearby components.
- Make sure you have a desolder pump and some desolder wick (this is a helpful video if you have never used one:
https://www.youtube.com/watch?v=Aw4lZGk90i4&t=92s )
- Buy some quality flux to apply after you remove the old component
As far as practising soldering skills goes, the A500 mainboard is about as easy as it gets
")
Now... as for SMD components. You cannot replace these with through hole ones, the A500 is a 2 layer PCB so literally tracks on the top, tracks on the bottom. The reason we use SMD components is when there are more layers than this where a hole cannot be drilled all the way through ( and it's also WAY cheaper to automate manufacturing this way), a smartphone for example can have up to 10 layers in one PCB!
Might be worth checking the general consensus in the Amiga community in terms of which type you use. You can solder with SMD ones like the originals or you can solder through hole style caps directly to the pads on the PCB. I've done this with a couple of my old synths however a lot of people do not recommend this as it could cause stress on the pads eventually causing them to tear from the PCB. Personally if I was re-capping a 600/1200 (or an entire board of capacitors on anything) I would replace them with the correct SMD style ones, i've only used the through hole style when literally replacing a single capacitor on a board.